Showing posts with label bead embroidery. Show all posts

Thursday, July 6, 2017


Beta Beaders

One of the things I have been working on is developing instructions and kits for my designs to sell. I taught in a local bead shop for several years and am a teacher in my other life, so I know the first step is to craft good instructions. Looking at the creative process from this angle - how to teach your design to someone else - is an interesting exercise. What can I assume people will know when they come to my design? How detailed should my instructions be? One wants to hit a happy medium between a half-page list and a 1gig file.

So I decided to recruit some Beta Beaders – my friend Connie was my guinea pig and she roped in two other willing innocents, Alicia and Jesse. Actually they were not novices – one of the things that led me to talk to Connie is that we are both stitchers and both Alicia and Jesse were too. So that would be the first assumption – don’t tackle a bead embroidery design if you have no stitching background – otherwise those tiny needles and misbehaving beads will be even more of an aggravation.

We got together one afternoon out on Connie’s lovely enclosed porch and had a grand time. The idea was for them to work their way through my instructions – I supplied them with a kit – and give me a critique. I tried not to guide them as the idea was for them to pretend they were doing this at home on their own.  Their advice and comments were right on target and I’m grateful. Doing the project as a group was also more fun – lots of opportunities for comparing and commenting and just plain beady horsing around.

And, no surprise, some things I never gave a thought to stumped them, other things I thought would stump them didn’t. For example, they had no difficulty stitching the crescent beads, I’m hoping because the advice I gave in my instructions was helpful. On the other hand, I neglected to make clear that when you pick up an O bead plus a seed bead, you are supposed to stitch back through the center of the O bead, not to one side of it – leaving the thread showing. I confess, that is so standard with me I never thought about it – but that’s the view from inside the beading universe, not elsewhere.

                             Beading on the Porch in the Summertime
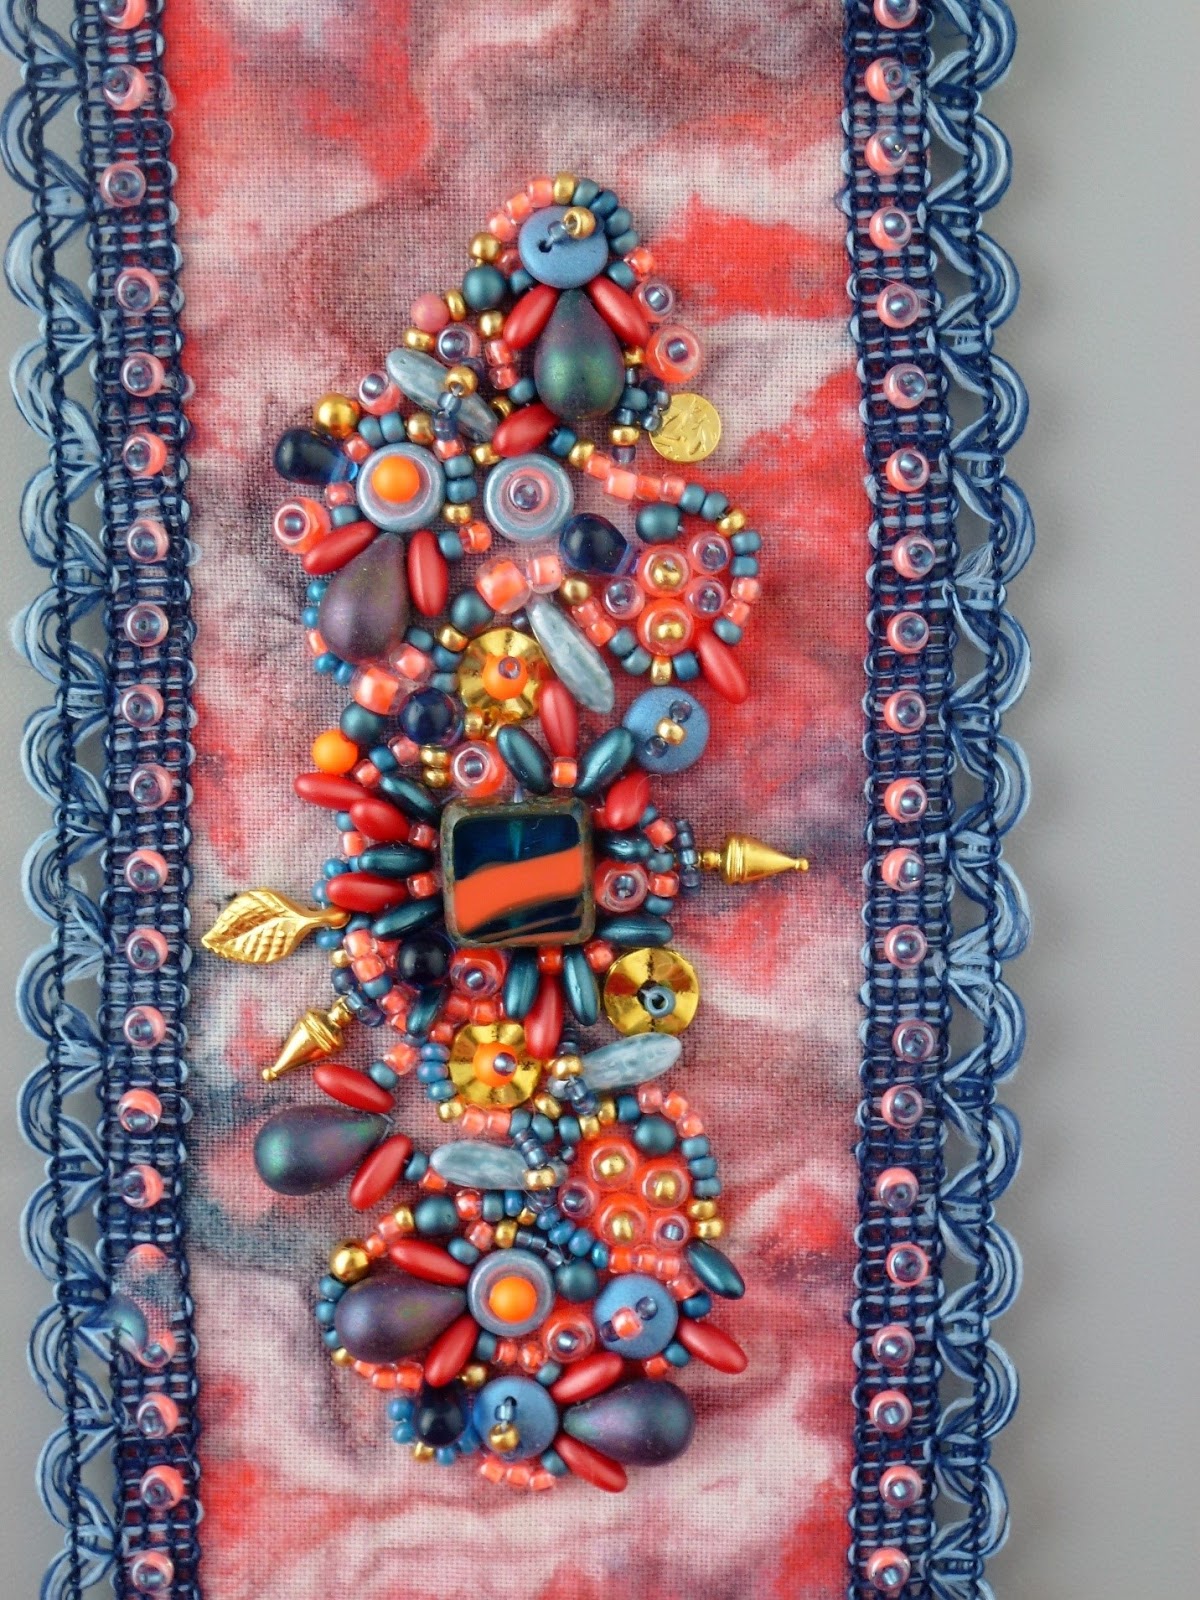
The project was a piece of bead embroidery using a brass filigree that I painted with Vintaj Patinas. I call it my Filigree Art Nouveau Pin (it can also be made into a pendant) due to its shape. I came up with three colorways and here they are:


                                                    “Dry Martini” 

                                                      “Hollyhock”

                                                       “Harvest”

My thanks to you all, it was a fun afternoon and I love my Beta Beaders!

Thursday, June 29, 2017


Old Glory

There are some color combinations I have trouble with and they are mostly of the holiday variety. Red and green as in Christmas, and red, white and blue as in July Fourth come to mind. And red and blue as in, I dunno, but that’s another one.

But I have found that if I use different versions of these colors they begin to work for me. For example, I remember doing a piece in red and blue for a friend at her request and sighed, as I thought it would be a tad boring. Maybe that’s the problem I have with these color combinations – they are overused. However, when I chose a cobalt blue and a red with a good deal of pink in it I was smitten. And something ho-hum turned into an exciting project.

I did not forget that lesson when I accidentally created a “holiday” palette on a piece of brass filigree I was painting:

This was a version of the patriotic palette I could live with and I immediately began calling it my “Old Glory” colorway.  It wasn’t long before I began adding beads to it. I picked a different filigree piece to paint, which had a place in the center where you could glue a cab. I have a stock of clear glass tiles and have begun painting them with nail polish (yes, now I have a nail polish stash that I never use on my nails). I had a perfect antique dark blue on hand and went from there:


So, what about Christmas red and green? Maybe crimson and olive? Hmmmm…

Thursday, May 25, 2017


Overdoing It

One of the hardest things for any artist to learn is knowing when to stop. It’s especially hard for beaders because we like to lay embellishment on with a trowel.  On the other hand, you learn something when you overdo it that is useful for when you try again, which you will inevitably do. After all, for many beaders, if you can bead one of something, why not bead more? Why not bead seven, yes, isn’t seven the most powerfully magical number, wouldn’t seven-- oops, sorry, wandered off into a Harry Potter flashback there. Of course Voldemort didn’t know when to stop either.

Where was I? Oh yes, here’s a design that started out well. Some bead embroidery around a piece of brass filigree I had painted and added a glittery cabochon in its center.


I started with the O beads, spacing them out fairly evenly and had in mind a kind of spreading peacock’s tail, but wound up with this delightful asymmetrical design. I could see this as a necklace with one strap extending from the filigree and another from the adjacent point.

But for some reason I didn’t leave it here, I decided to add beads to create a more even edging which would make it easier to cut out and finish. Here’s the result:


Not quite as interesting as the first draft. The edging smoothed it down a little too much and the filigree looks a bit lost among the seed beads. Though I will note that such might be a desirable effect, depending. Next time around, I’m still going to bead a border that smooths everything out, but I’m going to use black beads. That will give it more shape and drama while still allowing me to cut it out easily.  OK, back to the horcrux drawing board….

Thursday, March 16, 2017


Valley Tiles

I’m a big fan of the video game Monument Valley. If you aren’t familiar with it, it is nothing like any other game you have encountered.  For one thing, it breathes. Yes, I know that sounds weird but it does and it’s very calming. For another, it has an incredible design aesthetic, powered by M. C. Escher and Dr. Seuss, among others.

This is the only video game that ever made me go “ahh” – literally catch my breath at what unfolded. On the surface, it is a path which you help the intrepid Princess Ida navigate, but, given the Escher influence, you have to slow down and really look at what you are seeing, because things aren’t what you think they are, and trying to figure out how things work in the Valley universe is one of the most beguiling of pastimes. Like those books you cherish, you wish you could wipe your memory of them so you could experience anew the pleasure of their unfolding.

Don’t read any further, if you have the devices, go buy it. It’s inexpensive and will repay you many times over. Even after you figure out all the various puzzles, you will play it again and again just to gaze at it.

The game has a photo function and I have built quite a collection of these because of the design and the use of color:


And I have begun designing little tiles using shaped beads that have been inspired by it. Here’s one:


Thursday, February 2, 2017


Bead Fabrication

Having begun beading on  my friend Linda’s fabric by putting a pellon backing on it for easier stitching, I then realized that this method no longer limited me to the kinds of fabric I could bead on. I have a lot of these hand-smacking-forehead moments. The creative process can both open you up and give you a terrible case of tunnel vision.

Up to now I have been doing bead embroidery with something called Easy Felt, which you can get at most craft stores.  It’s not the floppy felt you might remember from your youth – I got a felt board with various floppy felt critters and letters one Christmas. I remember my Dad borrowing it to create title boards when he edited his Explorer Post whitewater canoeing movies.

But Easy Felt only comes in certain colors. Which is a pretty frequent beader’s lament: why doesn’t this bead/thread/felt come in more colors?  No turquoise, no seafoam, no rose, no celadon; red purple but no blue purple. But with pellon you can turn any fabric into essentially a piece of Easy Felt.

So, off to my home away from home, Jo-Ann Fabric, to buy monochrome fat quarters. The first one I worked with was in my favorite turquoise. I had bought a bunch of acrylic cabochons for another project that never quite took off, so was happy to find another use for them.

Here is the result. I like the somewhat muted palette that still shows a lot of color - with little accents (I restrained myself) using Czech shaped beads.


You will also notice I forgot to iron the fabric before I fused it. (Sound of hand smacking forehead – OW!!)

Thursday, January 26, 2017


From Back to Front

Last time I wrote about using fabric for backing bead embroidery. But I liked my friend Linda’s fabric too much to leave it back there; I wanted to bring it around to the front and feature it as part of a bead embroidery design. One of the challenges was actually stitching on the fabric, which was not all that easy to do, even using an embroidery hoop and a sharp needle. That piece did not get finished. Then I hit upon using pellon as an iron-on foundation. This worked perfectly, making it easy to cut a section of the fabric to wrist cuff size and stitch on it. 

This project also allowed me to experiment further with bead stitching in asymmetrical ways. (Don’t get me started on the division between beaders who love structure and those who love freestyle in their beadwork.)

Freeform beading can be great or it can be terrible. When it works, there’s nothing more absorbing than following where the beads want to go. When it doesn’t you sigh and mope and whine, maybe take another run or two at it which is no improvement at all, and eventually consign it to the dreaded Drawer of Unfinished Projects.

This time around I got lucky and the piece just created itself. Part of this was because I wanted the beautiful fabric to shine, so that helped restrain that bling-‘till-you-die impulse beaders are prone to overindulging.  At the time I was working on this I also came across these Gypsy Jangle bracelets while strolling and scrolling on my Pinterest app and fell in love with them: 


Now I want to run to Jo-Ann Fabric toting an air mattress and camp stove and just move in. That’s where I found the perfect trim for the edges of the bracelet.


 So, while the Drawer of Unfinished Projects may have closed on one piece, I now have a new drawer, full of nifty trimmings, fiber and fabric for designing.

Thursday, January 19, 2017


See What the Beads in the Back Room Will Have

Early in my beading life, I came across Ann Benson’s bead embroidery books and kits (you can drool over some of them here). These taught me a lot about stitching beads onto things.  I liked her sense of color, bead shape and design; I didn’t like stitching on a piece of stiff paper with the design drawn on it. I developed a technique for pricking holes in the design and using a metallic-ink pen to poke through them onto a piece of stiff felt (much easier to stitch with). Then I just connected the metallic paint dots and had my design.

What I really loved learning about was how to finish the work, using colorful fabric and fusible webbing.  This led to many pleasant hours grazing the fat quarters section of quilt shops. I now have, yes, a drawer devoted to swatches of fabric for this purpose.

A friend of mine gave me some fabric she had dyed and it really pleased me to be able to use it, as I did here for an embroidered pin.


The back should look as good as the front, eh?  All the parts should harmonize. Thank you Linda.

Thursday, October 27, 2016

Letting it Lie

I have talked about the Drawer of Unfinished Projects and what goes into it (you can find my post here). But there are other projects that, when left to lie around, percolate and produce something I really like. This may take weeks, months or sometimes years, but the result is worth waiting for.

This happens, for example, when I work with my stained-glass artist friend Beth on a design that combines both media.  It can take a while for the solution to setting a bezeled crystal in her stained-glass piece to materialize but I have found that it would come if I waited and didn't worry it too much.

I dragged my feet on another collaboration with her because of the subject matter. It was a lovely iris set in an octagon of green glass.  But it had a spider in her web in the center. That was my part of the work and I loathe spiders. It took me a long time to even begin to think about making one, shudder, shudder.

I finally looked at some beaded spiders on the internet (much more congenial than looking at photos of real ones, which I would have had to do peeking through my fingers or taking my glasses off) and beaded one. It made no pretense to being anatomically correct, as the bead artist would, in its making, have thrown up on it.

The spider's web was more fun. Looking at how a spider builds its web was fascinating and there were some nice (no spiders included) tutorials on how to make or draw one. Here’s a quick-and-dirty photo of the piece, with web, sans spider:


 Another piece that I can remember letting lie around involved a gorgeous polymer clay cab I bought from Chris Kapono at Mandarin Moon designs. I wanted to do it justice and intended to make it the center of a piece of bead embroidery. I sketched a few designs and even began stitching the border around the cab but I didn't like it and decided to let it lie. It did so for a good two years, becoming a familiar part of the Bead Room décor.

Then one day the solution popped into my head: this is what you need to do. I drew a sketch and traced it onto the felt and I finished it in days. Here it is:


So, lying around can be a good thing!


Thursday, September 29, 2016

Choosing Colors

How often have I held a tube of beads in my hands, of a beautiful or unusual color or finish, and resolve: I am going to make something with you!  And how many times does it not happen?

Sometimes it does work out – where I have a color to start with and I just start matching other tubes with it. Often a color will “pop” against it, or an unexpected pairing will make me go “ooohhh, yeahhh” - which is one of the moments beaders live for.

But generally I find that as much as I want to use this color, these beads, right now, the search frequently winds up in a dead end.  My lesson is: you can’t force a color on yourself. Despite the many challenges bead bloggers make to their readers – make something with orange! Use a color you hate! – it doesn’t work for me.  I want to color outside the lines as much as anyone who has a monster bead stash. Not only aesthetically, but practically I want to use those beads I bought.  But alas, the colors dictate more than I like to admit.

Color tastes change too. When I started out beading I was the Bling Queen. The shinier, the gaudier, the more I liked it. If the beads weren’t silver-lined, I wasn’t interested. I privately referred to this preference as “bordello chic,” though I hasten to add that I have never been in such an establishment so please don’t get any ideas!  I expect it came from watching the marvelous Régine in “The Seven Per-Cent Solution” as an impressionable young person.

My color preferences have expanded over the years and embraced a somewhat more muted but I like to think more complex palette. This is the result of the Raku Revolution in bead manufacturing – of creating beads that have that amazing finish.   Like these:


Photo from Baubles and Beads

These days I let the focal beads I’m working with do my blinging for me. That also pares down the palette decisions, an added bonus.

To show you what I mean, here’s a piece of embeadery (my term for bead embroidery – check out my Pinterest board under that title) done around a polymer clay cab by Chris Kapono of Mandarin Moon, whose work is largely responsible for the drool marks on my laptop. I wore this piece to a bead show and one of the exhibitors said it looked like a peacock. Hah! No surprise there. Now of course I can’t see anything but the peacock when I look at it. Ah well.

So yes, I still do bling, but with dignity.


Friday, September 16, 2016

Blue Waters

One of the things I resolved to do upon starting a blog was to respond to bead challenges put out there by other bloggers I followed. I’m not very good at keeping deadlines when it comes to beading. Beadwork should ebb and flow and get done when it gets done. Otherwise it becomes beadWORK.

But when a challenge is timely – both in theme and deadline – I found I could do it, and with pleasure.  This would be Love My Art Jewelry’s Caribbean Color Palette Challenge. Sherri Stokey offered a luscious photo to inspire readers:


Only a beader’s heart would beat faster seeing a mess of tubes and strands. And those lurrrrvvely art beads.

One of the things I liked about Sherri’s palette is that it included a color I don’t work with much, white.  I’ve always found it boring and you have to be careful about what color of thread you use with it. White also tends to pop; it’s a muscle color and likes to throw its weight around.

I knew immediately what I wanted to make. I have been doing a lot of bead embroidery this past year, using the new Czech shaped beads that have been blitzing the market: two-hole beads, four-hole beads, triangles, squares, crescents, as well as wild new finishes -  mottled, shiny, matte, you name it.

I found that these shaped beads fit quite snugly around one of my favorite types of cabochons to bead with – Lunasoft cabs. These are made of Lucite with a metallic backing that makes them glow. I also don’t hold with using plastic or acrylic beads in my beadwork, but I make a tremendous exception for them.


I call this “Blue Waters” and kinda wish I was dabbling my toes in the surf on a balmy beach somewhere, now that autumn is flowing in. Just a last taste of summer, please.

Check out what others created over at Love My Art Jewelry, which can be found here.

Thursday, September 8, 2016

Cat Hair

One of the joys of going public with one's beadwork is taking a nice juicy photo which looks great on the viewfinder of your camera, only to get this when you blow it up:


 Cat hair. Yikes!  It showed up even more on the back of the piece:


But how can I have a bead room without a cat in it?  My cats have all been great about my beads and I have woven a bit of them into most everything I make. But you don't want so much of it that you find yourself becoming a weaver of cat hair rather than beads.  One of my rituals on sitting down to bead is to run an Extra Sticky Pet Roller up and down my shirt and over my bead mat. Otherwise I'll spend too much of my evening engaged in the beading equivalent of picking corn silk out of my teeth.

I realize that cat photos on the internet are as trite as glitter-spouting .gifs but thought I would share some today. My furry guy loves to leap up on my beading lap desk and investigate what I'm working on and here he is checking out a Japanese ribbon embroidery bracelet I made from a class I took with Sherry Serafini at Bead Soup in Savage, Maryland.


Those are my stockinged feet down there.


That’s right, eat that shibori ribbon and throw it up on the carpet later, good boy.